The Four Heads
A cylindrical shell made of 0.500 inch thick Sa-516 70 material (rated to 20,000 psi at 100°F) is rolled to 48” OD. The inside diameter (ID) ends up at 47”. This cylinder and the seams joining it to any attached heads are fully radiographed, and there is no corrosion allowance. The ASME VIII-1 calculated design pressure for the cylinder is 420 psi.
Four commonly used head types on vessels are Hemispherical (Hemi), Semi Elliptical (SE), Flanged and Dished (F&D) and Flat. For this article, each of the four heads is attached to the cylinder, with diameters matching on the ID. The wall thickness is varied to meet the 420 psi rating of the cylinder. The full calculation set is linked below.
The results – thickness, height, volume and weight of one head only, including straight flanges when present:
| Head | Thickness [in] | Outside Height [in] | Volume [US gal] | Weight [lbs] |
| Cylinder, 24” long | 0.5 | 24 | 180.25 | 506.7 |
| Hemi | 0.2474 | 23.75 | 117.7 | 245.5 |
| SE * | 0.4947 | 13.74 | 70.1 | 397.3 |
| F&D * | 0.8901 | 10.29 | 47.7 | 602.9 |
| Flat | 3.9120 | 3.91 | 0 | 1920.8 |
| * Including the 1 ½” straight flange | ||||
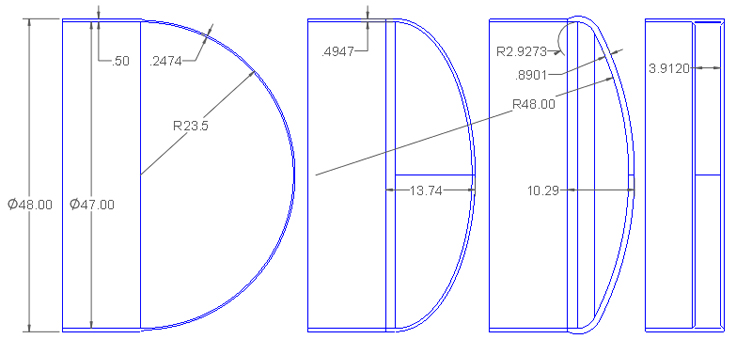
Hemispherical Head (Hemi)
The hemispherical head has a simple radial geometry: the depth of the head is half the diameter. With a 47” ID, the required wall thickness is 0.2474”, about half the thickness of the shell. Because the head is thinner than the shell, a standard code 3:1 taper is used on the transition. (The transition is part of the stronger head, the shell is not tapered down on the straight section because it needs the full thickness.)
Usually a hemi head cannot be formed from a flat sheet, instead it is made from welded pieces, making this, the thinnest head, sometimes the most expensive. It is commonly used in large diameter or high pressure applications where material savings are important. Two spherical heads back to back make a storage sphere, the most efficient shape for pressurized storage.
Semi Elliptical Head (SE)
The Semi Elliptical head has an elliptical form – the most common ratio is 2:1 – or the width of the ellipse is twice the depth. (the width of the head is 4x the head depth). Other ratios are possible but not commonly used. In practice the fabricator will often make the SE head from 3 radii that approximate an ellipse – large in the crown, smallest at the outside diameter, with an intermediate radius in the middle. Code rules dictate how close the approximation has to be to a true ellipse. Code rules also exist allowing a two radius – crown and knuckle – which would normally be considered as a F&D head, to be considered a SE head if special values are used (Ug-32(c): An acceptable approximation of a 2:1 ellipsoidal head is one with a knuckle radius of 0.17D and a spherical radius of 0.90D.).
This 2:1 SE head is made from half of an ellipse, so the head depth is a quarter the diameter. The depth is half as much as the hemi head, but more than the F&D and Flat head. SE heads can be made from a flat plate, resulting in what is often the most economical head for low pressure vessels.
The SE is not as efficient at handling stresses as the hemi, so the design rules require more thickness. The ASME code design formulas for a 2:1 SE are very close to that of the cylinder – in this case resulting in a required thickness of 0.4947” for the SE vs 0.500” for the cylinder.
Flanged and Dished (F&D)
Flanged and Dished heads are commonly used where pressure is moderate and the overall height is important. Here a 48” inside radius (equal to the outside diameter of the cylinder) used for the crown of the head, along with a tight 2.973” knuckle results in a head that is lower than the semi-elliptical. The tight knuckle radius results in high forming stresses – in this case post forming heat treatment (stress relief) is required.
The flanged and dished head requires more thickness than the matching cylinder, here 0.8901”. Again a code standard 3:1 transition on the straight flange portion of the head (Which only needs to be 0.5000”) handles the difference in thickness. Unless the height is important, a vessel with a pressure as high as this 48” design would typically use a SE instead.
Flat Head
The hemi head is the most efficient, containing the pressure in pure tension. The other designs substitute various amounts of bending stresses at lower efficiency to lower the head height and pay for it in increased weight. This flat head, working purely in bending, pays for it with a massive 3.9120” thickness. Flat heads are usually reserved for processes that require flat inside surfaces.
Many solutions have been developed to provide flat heads on the inside of the vessels without the huge weight of steel a flat head requires:
A flat plate with tie rods or rings connected to the SE or F&D head it is mounted in. The head supports the load, and the plate provides a flat surface for the process.
Pouring a flat concrete floor in SE or F&D heads. The weight is still very high, but much less steel is used.
Thin flat plate supported by exterior beams across the width.
Thin flat plate with stay rods (or tubes) through the length of the vessel to the opposite flat head.
Thin flat plate with diagonal stay rods tied to the shell – often seen in boilers.
Stresses by Finite Element Analysis (FEA)
Cylinder and Hemi Head Tresca Stresses
The ASME VIII-1 code equations used for Cylinders and Hemi heads are easily derived. The ½” thick cylinder ends up with a stress equal to the code design stress limit of 20,000 psi. When calculated by FEA using a Tresca formulation, the stress is 20,484 psi Tresca or Stress Intensity P1-P3. Also the 0.2474” thick hemispherical head ends up with a stress of 20,364 psi. Both stresses are very close to the target of 20,000 psi.
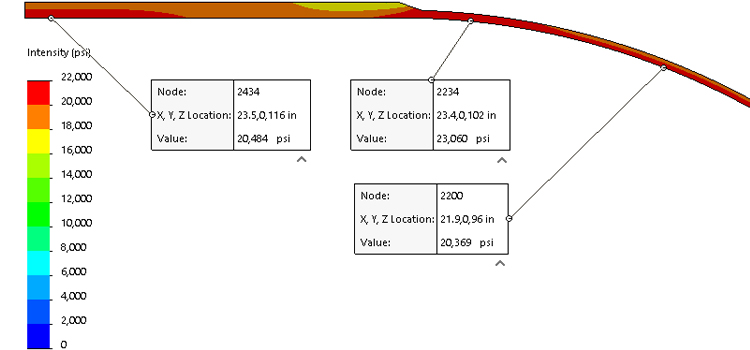
Stress Intensity (P1-P3) in a Cylinder and Hemi Head equaling the code design target stresses. The discontinuity zone shows the highest stresses (thin shell beside the transition).
The stress is higher in the discontinuity zone of the head to shell junction (23,060 psi). The VIII-2 code rules allow for these increases over small distances and provides limits. The stress in this case is acceptable. The VIII-1 rules, beyond the requirement for a 3:1 taper, ignore these stresses which by experience are known to work.
Cylinder and Hemi Head von Mises Stresses
The Tresca stresses provide a very close match between the VIII-1 code rules and the measured FEA stresses for the cylinder and the Hemi head by VIII-2 FEA methods. However, VIII-2 changed from using Tresca (P1-P3 stress) to von Mises formulation.
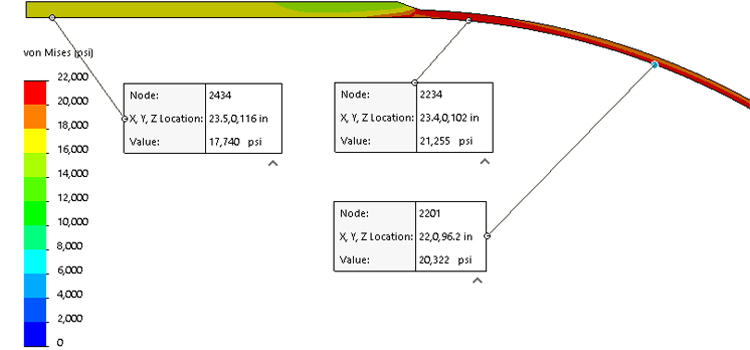
Von Mises stress in the cylinder and hemi head – the cylinder stress is now 12% below the VIII-1 code
Theoretically von Mises stress results range from equivalent to Tresca (P1-P3), to 15% lower. In this example the reported stress in the cylinder is now 17,740 psi, 12% below the reported Tresca value, but the reported stress in the hemi head remains at 20,322 psi.
FEA results are required to be done to VIII-2 methods, including the use of von-Mises stress reporting, however VIII-1 stress equations that are derivable are done to Tresca methods. VIII-2 has rules for the design of cylinders which match the Tresca stress methods, however, VIII-2 allow the use of Part 5 FEA rules to replace Part 4 design rules.The designer will get a thinner cylindrical shell when designing to VIII-2 part 5 than VIII-2 part 4. As FEA methods from VIII-2 part 5 gradually replace code rules as found in VIII-1 and VIII-2 part 4, reduced cylindrical thicknesses will be seen. The hemi heads will not change.
The remainder of this article uses von Mises reported stress.
Stresses in SE & F&D Heads
The VIII-1 formulation for 2:1 SE heads results in required thicknesses equal to that of the shell. However, the code equation is not a predictor of actual stress. It is a design rule that produces results that are known to work based on a combination of what can be easily calculated, and appropriate factors of safety to keep the design safe. The actual stress in the SE head is higher in the knuckle region and equal to the design stress in the crown. VIII-1 nozzle reinforcement rules account for this requiring more reinforcement in the knuckle region.
The F&D head, even with its thicker construction, has much higher stress in the knuckle region. It is common in thinner F&D heads to exceed the VIII-2 allowable stresses in the knuckle. Programs like Nozzle Pro often cannot calculate nozzles in F&D heads, because the heads fail VIII-2 rules, even without the added stress of an included nozzle. F&D heads are known to be safe, but if the heads were invented today, the required thickness for some would be higher. Designers are particularly cautioned about putting large nozzles in the knuckle region.
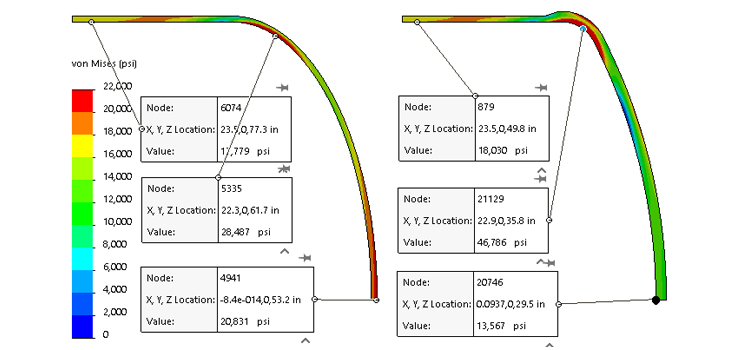
Be cautious using FEA for the design of these two head types because the knuckle stresses are in tension in the longitudinal direction (along the length of the shell) but can be compressive in the radial direction. The knuckle of these heads can buckle if made too thin.
As FEA methods are more commonly used, we expect that F&D head thicknesses (for large diameter thinner heads) will be higher. We do not expect SE head designs to change much.
Stresses in Flat Heads
VIII-1 formulas for flat heads result in heads that have center section stresses as calculated by FEA much lower than code rules allow. The flat head is in bending, which has allowable stresses of 1.5x membrane, or 30,000 psi in this case. The actual center stress is half of this. The code rules are more focused on the head to shell transition where an overbuilt head keeps the transition safe.
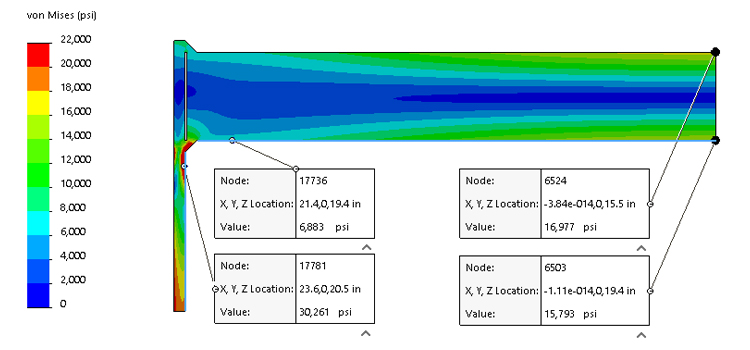
As designers get more freedom to use VIII-2 FEA methods in flat head design, where possible the heads will be made thinner all round, with more thickness in the center than the edges. These thinner heads will have more rotation at the head to shell junction requiring the designer to give this area much deserved attention. As FEA use becomes more common, we expect flat head thicknesses to reduce.
Contact: Judy Wu
Phone: + 86 15269864663
E-mail: [email protected]
Add: Qiu Jiadian Industrial Park, Tai'an City, Shandong Province, China